Preparation
Loaded 7引擎需要一个MySQL数据库来存储信息. 在安装Loaded 7之前,请确保已经创建了MySQL数据库. 您可以使用托管提供商的控制面板phpMyAdmin工具进行确认.
You can check the detailed tutorial on How to create a MySQL database. 如果您在此阶段遇到任何困难,请联系您的主机提供商以获得支持.
When creating a MySQL database, you'll need to specify its name, 用户名和密码,并记住数据库服务器地址. 保存所有这些数据,以便在Loaded 7安装时使用.
Loaded 7 engine installation
1. Server requirements
确保您的主机符合Loaded 7系统要求:
The Linux Operating System
The Apache Web Server version 1.3 or later, with mod_ssl.
MySQL database version 4.1.13+ or 5.0.7+
PHP 5.3+ (with MySQLi extension)
- PHP Settings:
- - PHP Setting ON
- FILE_UPLOADS
- - PHP Setting OFF
- REGISTER_GLOBALS
- MAGIC_QUOTES
- SESSION.AUTO_START
- SESSION.USE_TRANS_SID
- - POST_MAX_SIZE: 10M
- - UPLOAD_MAX_FILESIZE: 10M
- - PHP Setting ON
- PHP Extensions – REQUIRED
- - mySQLi
- - GD
- - CURL
- - OPENSSL
- - Phar
- PHP Settings:
PHP编译时与Suhosin/硬化PHP尚未测试.
suPHP在服务器环境中的工作方式与启用PHP的方式相同.
Please note: ionCube Loader (version 4.4.1或更高版本)是付费插件(如Loaded 7的Pro和B2B版本)以及一些单独的本地和第三方插件的功能所必需的组件.
2. Downloading
要安装Loaded 7,你需要从官方网站下载引擎 www.loadedcommerce.com/home/download/.
在下载部分输入您的姓名和电子邮件,然后单击 'Get Free Download' button.
确保您正在下载的版本与您的模板兼容(在模板需求中有说明). All Loaded 7 releases are available on GitHub.
3. Extracting files
下载完Loaded 7后,你需要解压缩文件和文件夹.
You can do it with WinZip (PC), StuffitExpander (MAC) and other similar software.
请查看如何解压缩文件的指南: WinZip (PC) and StuffitExpander (MAC).
注意:如果在您的主机控制面板中 'Extract/Unarchive' function is available, you can upload the .将压缩文件解压到服务器,并在那里解压缩.
4. Uploading the Loaded 7 files
如果您已在计算机上本地解压缩文件, 您需要将它们上传到托管服务器.
您可以使用主机控制面板文件管理器或FTP管理器(如FileZilla)来完成此操作, TotalCommander, CuteFTP, etc.
Please check the guides: How to upload files to server or 如何上传文件到服务器使用cpanel (WebHost管理器,WHM).
上传的包笼的内容必须复制到服务器上. 上传后的文件夹结构应该是这样的:
/home/user/public_html/
/srv/www/htdocs/
/usr/local/htdocs/
/var/www/vhosts/domain.com/httpdocs/
下面是上传的packcage内容解压后的样子:
loadedcommerce/
readme.txt
license.txt
5. Loaded 7 file and folder permissions
首先,将配置文件重命名为“includes/config_dist”.php' to 'includes/config.php'
以下文件和文件夹必须是可写的:
| Files | Writable |
|---|---|
| includes/config.php | Yes |
| Folders | Writable |
|---|---|
| admin/images/graphs | Yes |
| images/banners | Yes |
| images/categories | Yes |
| images/manufacturers | Yes |
| images/products | Yes |
| includes/work | Yes |
6. Installing the Loaded 7 engine
当所有需要的文件上传到服务器时, 您可以开始加载7引擎安装. 打开浏览器,在浏览器地址栏中输入域名和加载7文件夹的路径: “domain_name / path_to_loaded7_directory /安装.' Then go to this page. You'll see a welcoming message. 按照欢迎页面上的说明安装Loaded 7.
Step 1: Welcome
Choose the installation method: 'Upgrade from 6.x Version' (if you're using an older version) or 'New Install' (for a clean installation).

在本例中,我们将执行一个新的安装 'New Install.'
Step 2: Database
Input the database server details
| Setting | Description | Possible Value |
|---|---|---|
| Server Address | 数据库服务器的地址(主机名或IP地址). | localhost |
| Username | 用于连接数据库服务器的用户名. | user |
| Password | 与用户名一起连接数据库服务器时使用的密码. | p@ssw0rd |
| Database Name | 要保存数据的数据库的名称. | loadedcommerce |
| Database Type | The database server software that is used. | MySQL |
| Table Prefix | The prefix to use for the database tables. | lc_ |

若要获得提示,请将鼠标悬停在字段名称后的信息图标上.

Fill in the required fields and click the 'Continue' button.
Step 3: Web Server

确保所有必要的目录都具有写权限.
After you've checked that, click the 'Continue' button.
Step 4: Settings
填写店主和管理员数据.
Attention! 将用户名和管理员密码保存在某个地方,因为它们是商店管理所需的.

After you've filled it in, click the 'Continue' button.
Step 5: Finished!

如果配置文件不可写,可以通过FTP手工编辑.
出于安全考虑,您需要删除 /install/ directory on your hosting server.
如有任何问题,请参考 Loaded 7 official guide.
Loaded 7 theme installation
Installing the theme without sample data
1. Getting the template ready.
在继续之前,请确保您已经下载并解压缩了模板. 您可以查看有关如何使用解压模板的指南 WinZip and StuffitExpander.
一旦文件被提取出来,就可以开始模板上传了.
2. Installation.
1. 将主题(/admin和/templates)文件夹的内容复制到主机服务器上的Loaded 7引擎的根目录下.
You can watch the video guides How to upload files to server with FTP and 如何上传文件到服务器使用cpanel (WebHost管理器,WHM).
2. Log into your shop admin panel.
3. Navigate to the Settings -> Setup -> Templates 选项卡,选择要安装的模板,然后单击 '+' button.

4. Having installed the template, click the 'Edit' button.
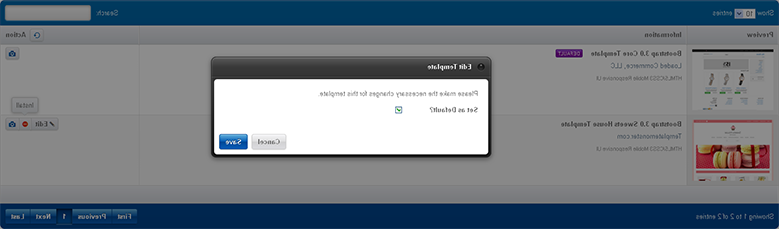
5. Check 'Set as default' and click the 'Save' button.
6. Go to the Settings -> System Tools -> Cache Control tab and select the 'All' option in the drop-down list.

7. After this, select 'Cache Blocks' and in the 'With Selected' drop-down list, select 'Delete.'

3. Blocks positioning
To have the template look like the demo, 您需要将主题中使用的所有块定位到描述的位置 'Template Configuration' page.
要将块设置到特定位置,请遵循以下指导:
1. Go to the Settings -> Setup -> Templates Modules Layout -> Boxes tab or Content.
- 请确保您正在编辑正确的模板位置.

2. To add a module to a position, click the 'Add Template Module' button.

3. 在弹出的窗口中,根据说明设置所需模块,点击 'Save' button.

4. Repeat the steps for all required blocks.
Installing the theme with sample data
Having installed the sample data, you'll get a Loaded 7 based shop, 和你在演示中看到的完全一样. 它将包含样品产品,存储设置,模块等.
不要将示例数据安装到工作站点中! 该数据将替换您商店中的所有产品并覆盖所有设置.
在继续之前,请确保您已经下载并解压缩了模板. 您可以查看有关如何使用解压模板的指南 WinZip and StuffitExpander.
一旦文件被提取出来,就可以开始模板上传了.
1. 复制主题(+示例数据)文件夹的内容(/admin, /templates和/images)放到你的Loaded 7引擎的根目录下.
You can watch the video guides How to upload files to server with FTP and 如何上传文件到服务器使用cpanel (WebHost管理器,WHM).
2. Sample data installation.
-
The sample data is provided as an .SQL文件,位于主题(+样本数据)模板文件夹中,称为dump.sql.
The dump.sql文件可以与phpMyAdmin工具或您的托管数据库管理面板一起安装. You may need to check this guide: How to import sample data dump file.
-
在导入之前,请对数据库进行备份. You can watch a detailed video tutorial How to back up a database.
确保您的Loaded 7版本满足模板需求. Otherwise, your database will be damaged.
After the completion of the dump.sql导入时,您的存储应该与演示完全相同.